

Featured Project
Customer Service for Real Estate Agents
I designed this scenario-based concept project for new real estate agents who need to increase sales by improving the overall customer experience.
Overview
Audience: New real estate agents who have identified customer experience challenges as a barrier to increased sales outcomes.
Responsibilities: Instructional Design, eLearning Development, Storyboarding, Action Mapping, Prototyping, QA Testing
Tools Used: Articulate Storyline 360, Canva, Google Docs

A real estate brokerage noticed that their new agents were not providing the best experience for their customers. This led to an increase in customer complaints and a decrease in overall sales outcomes.
After analyzing the problem, I identified skills and knowledge gaps as the root cause of the negative customer experience. I proposed a scenario-based eLearning experience where new agents could identify ways to address common customer requests/complaints.
The goal was to improve the customer experience by providing new agents with a practice environment to learn and make mistakes. It was important for them to be able to use their critical thinking skills to keep them engaged in the learning and to examine the benefits and consequences of their choices. I also proposed that there be a guide to provide feedback – Jemma, an experienced real estate agent/ customer experience consultant.
My proposal was accepted and the design and development process began.
Process
I used the following steps to complete this project: Action Map > Text-Based Storyboard > Visual Storyboard > Interactive Prototype > Full Development

Action Map
I consulted with an experienced real estate agent as the subject matter expert (SME). I developed an action map to flesh out the main goal for this project. We prioritized the key individual actions that would serve as the basis of each scenario.

Text-Based Storyboard
I used a text-based storyboard to turn the previously identified key actions into a cohesive narrative. In the story, the learner is placed directly into the action by following Jemma as she makes her rounds to consult with different agents. This places the learner directly into the story and positions them to use their critical thinking skills as they draw on their own expertise for each scenario.
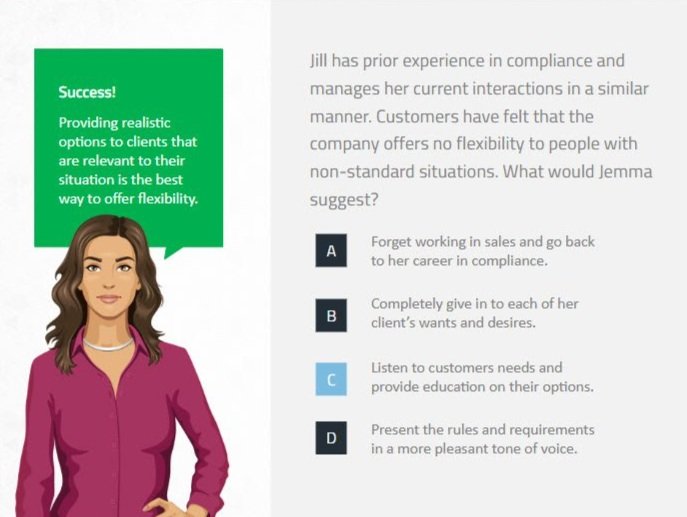
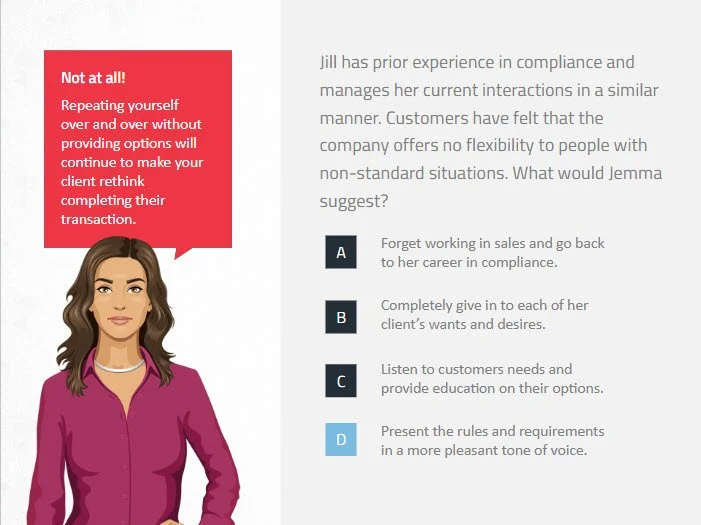
On the left side of the screen, each slide is formatted to show a brief problem statement from the characters. On the right side of the screen, learners are given more context regarding the problem statement and prompted to answer the question, “What should Jemma advise?”
Following the question prompt, learners are given four answer choices that can be used to address each situation. If an incorrect answer choice is selected, learners will be given feedback that explains why the answer choice is incorrect and will be prompted to try again. If the correct answer choice is selected, the learner will be given feedback explaining why the answer is the right choice and prompted to continue. An additional layer element present in the feedback bubbles has to do with color. The best choice is reinforced by using a green speech bubble. Choices that fall in a gray area between correct or incorrect (for various reasons) are reinforced using a yellow speech bubble. Incorrect choices are reinforced by using a red speech bubble. Utilizing color in this way allows learners to subconsciously associate answer choices and corresponding feedback with the color. This helps with retention because learners can place the new information on more than one mental shelf.

Visual Storyboard
The visuals utilized in this course were sourced from the Storyline library. I wanted to push myself creatively to see what I could come up with by only using what was already available in the tool. This included features for the slide layout, color scheme, and character images.
I combined my text-based storyboard with the visuals during the review process to provide a clear picture of what would become the final product. This allowed me to keep everything organized and plan out the specific programming features needed for each slide (ex.: layers, buttons, triggers,etc.)

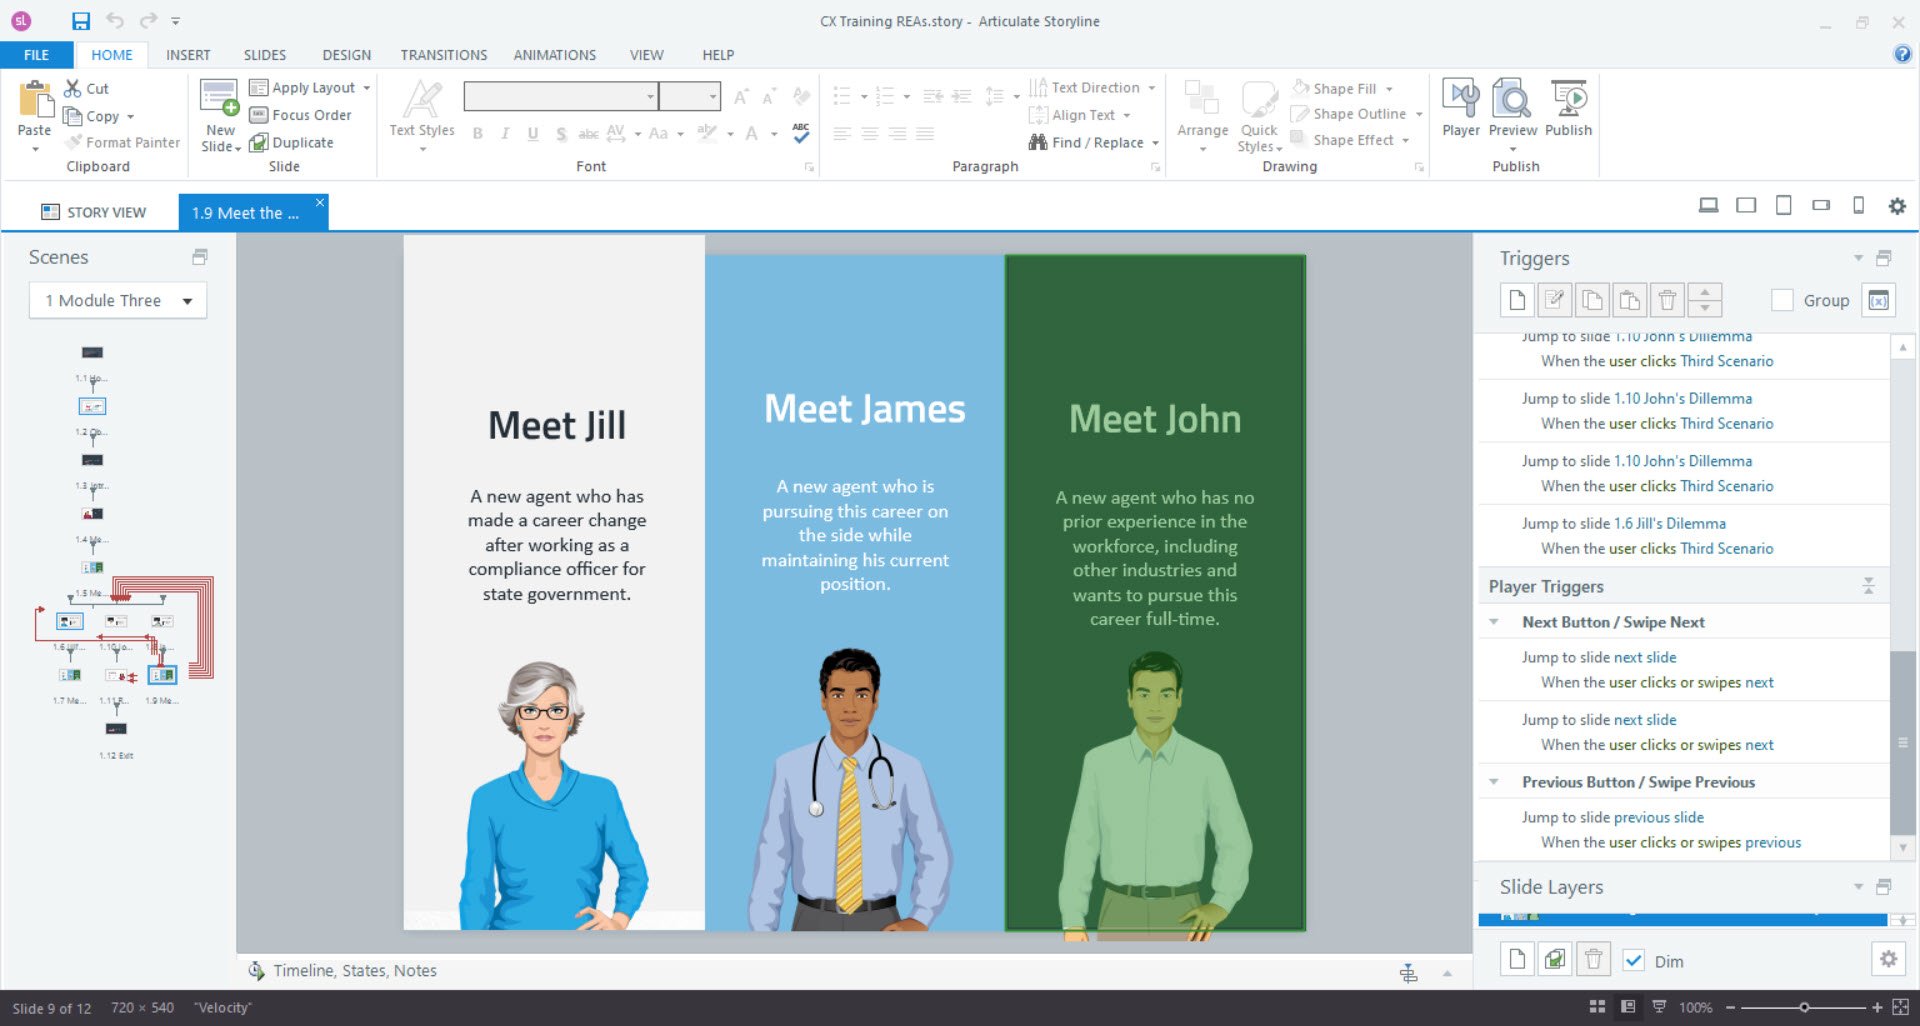
Interactive Prototype
I created an interactive prototype in Articulate Storyline 360. This allowed for the look and feel of the course to be reviewed before fully building out the entire project. Receiving feedback at this stage in the development process made it easy to make adjustments accordingly. This also allowed me to templatize what was working correctly, which sped up the rest of the development process.
The prototype included the “Meet Jemma” introduction slide, the “Meet the Agents” introduction slide, and the slide for the first scenario-based question. The scenario-based question slide included the attention-grabbing problem statement, the detailed problem statement, the question prompt, and corresponding answer choices. Each slide also included feedback layers with speech bubble color reinforcements.
Full Development
The full development of this project also took place in Articulate Storyline 360. It was straightforward and took about three days to complete. This was due to the groundwork that was done with the storyboards and interactive prototype. Once the interactive prototype was completed, I made minor adjustments based on feedback. I then used the first scenario as a template for the second and third scenarios. This allowed for all visual elements and functionality to fully be intact. The only thing left for me to do at this point was replace each character image and scenario text and make sure that each scenario was triggered and routed to the right place. After completing quality assurance testing, the completed project was ready for implementation.


Results and Takeaways
I have received positive feedback on this project from my instructional design peer group. The most notable feedback has to do with the organization and clarity of the scenarios and the effectiveness of the feedback with the color reinforcements. This is largely due to the storytelling in this project adhering to the following formula:
Setting - Learners are given the setting during their first encounter with Jemma. This gives learners context and a lens to view the story.
Characters - Learners are introduced to Jemma and each of the new agents she is consulting (Jill, James, and John). This gives learners a persona in a similar setting that they can relate to, which increases buy-in and engagement.
Conflict - Learners are given problem statements for each character’s scenario. This gives learners a “so what” to care about in the story. This point of tension is what triggers left-brain and right-brain thinking to work together, which helps to make the story memorable.
Resolution - Learners are given a resolution to each character’s problem statement in the feedback received from Jemma. This helps bring the learner through the conflict and provides them with a solution to their problem.
To improve this project, I would implement the following updates:
Additional Feedback Options - to simulate realistic reports learners may encounter in the workplace and expand scenario complexity
Gamification Elements - to help learners keep track of their progress on the front end and increase neurotransmitter stimulation (i.e. give them a dopamine jolt)
Implement xAPI - to keep track of learner progress on the back end and improve future learning solutions and updates based on impact
Narration Component - to guide learners through the module and provide additional accessibility
Visual Storytelling - to provide visual reinforcement of key topics and give module a modern look and feel using outside resources, such as Vyond or Freepik for character vector images